Demo setting
K8055-MARIE
While the web server is already working and thus set K8055MARIE-demo.htm is accessible via the Internet by typing http://YOUR_IP/K8055MARIE-demo.htm (where YOUR_IP is the IP address of your computer), access to the USB card using K8055-MARIE be activated.
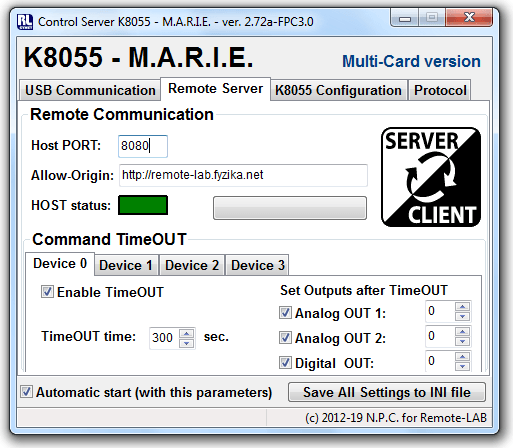
In K8055-MARIE tab Remote Server (see Fig. 1), set the communication port (choice Host PORT), after which the website K8055MARIE-demo.htm to communicate with the K8055 USB board. Port value is set by default to 8080, but can be changed. Selected port obviously not be occupied by another Web application (eg camera server, etc.). Beware the security settings of the firewall operating system. It is possible that you will permit the specified port firewall asked.

Figure 1 - Remote Access Setup tab Remote Server
The second parameter that allows you to accept commands only from the selected control website is callsign Allow-Origin. It is the URL of the page that is allowed to send control commands. Default value is *, which means that orders can be received from any website that sends the request.
K8055-MARIE application to connect to the Internet using the START Server (beware of possible query firewall - access is necessary to enable).
By checking the option Next start is automatic with this paramaters (to ver. 1.11A) or Automatic start (with this parameters) (since ver. 1.15A) is stored parameters specified in the INI file. It automatic start USB connection and control server with last parameters after next K8055-MARIE start.
Website K8055MARIE-demo.htm (Valid for the K8055-MARIE version 2.56 and higher)
Now we need to set parameters for access from the website to the application K8055-MARIE. We will work with the HTML file K8055MARIE-demo.htm from the directory C:\xampp\htdocs\.
Open the file K8055MARIE-demo.htm in any text editor (eg Notepad). We have to change some lines in the section head:
			<!DOCTYPE html>

			<html>

			<head>

			<meta http-equiv="content-type" content="text/html; charset=UTF-8" />

			<title>K8055-MARIE : Demo</title>

			<!-- BEGIN - JavaScripts for Remote Control -->

			 <script src="jvs/jquery-3.2.1.min.js"></script>

			 <script>

			  var MARIE_URL = 'http://localhost:8080';

			 </script>

			 <script src="jvs/K8055.js"></script>

			 <script>

			  SetCurrentDevice(0);

			 </script>

			<!-- END - JavaScripts for Remote Control -->

			:
In line:
var MARIE_URL = 'http://localhost:8080';
we change YOUR_IP to the IP address (or URL) of the computer where is application K8055-MARIE installed. Parameter :8080 is the port number on which the application is listening K8055-MARIE - see Application Settings.
If you have everything set up correctly it should be possible to remotely control the website K8055 USB card.
- CAUTION:
- Be careful when operating on a corporate or school network. Collaborate with your network administrator in this case!
YAWCAM
Since the Web site you want to monitor response K8055 USB board using a webcam, we have to set the application YAWCAM - server webcam.
Run the application YAWCAM in choosing Settings choose camera option Device → Change to (or Detect webcam).
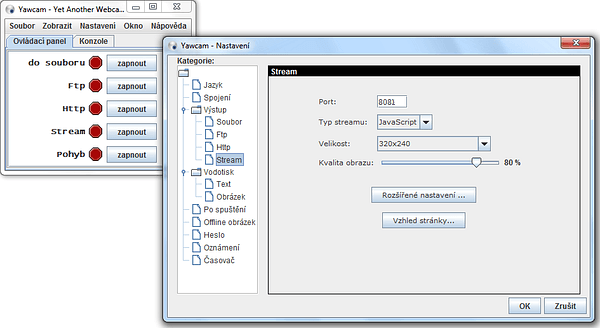
In choosing Settings → Edot Settings → Output → Stream(see Fig. 2) you must specify the communications port, after which the application will be broadcast YAWCAM image webcam. The default value is 8081 (if not in conflict with another application we have it).

Figure 2 - Setting Output Server Web cameras
Select the type of image transmission in choosing Stream type. Select JavaScript or MJPEG.
For other treatment settings YAWCAM recommend to visit the author's website and study the documentation (definitely it will be worth).
It remains display settings webcams in your website
<!-- ************************ WEBCAM ************************ -->

<iframe src="http://127.0.0.1:8081/" width="320" height="240" frameborder="0" scrolling="no"></iframe>
<!-- ******************************************************** -->
where http://127.0.0.1:8081 change to the public IP address of your computer. Entered after the colon is the port number on which the server sends a webcam. After you save the file change of address.
Installation is complete. It is now possible from any computer in the world connected to the Internet control panel K8055 USB connected to a host computer and watch everything connected webcam. Just load the page K8055MARIE-demo.htm typing http://YOUR_IP/K8055MARIE-demo.htm (where YOUR_IP is the public IP address of your computer).
Appendix:
YAWCAM and two cameras on one PC*
YAWCAM is a great application for controlling webcams. Since version 0.5.0 it no longer has a problem with saving settings, if it starts multiple times. We may start YAWCAM twice, both instances store their settings in the same place. The first application reads settings normally the second instance reads/creates a subdirectory named 2. But if we run YAWCAM only once and we want to load the settings from a subdirectory 2, we fail - it reads settings from the main directory. We will show you the following trick to set this application so that it can be used independently two webcams and the setting was always there when we need it.
* You do not need it for running the demo, but everyone who will also design your own projects, it will use.
Setting procedure: (YAWCAM version 0.6.0)
Install YAWCAM for example to a folder: C:\Program Files\yawcam1. The application YAWCAM do not start yet!
Create a copy of the folder yawcam1 in the same place (C:\Program Files\) and call it yawcam2. Now we have two independent copies of the YAWCAM.
Open file service_profile.cfg in the folder yawcam1 by a text editor (eg Notepad) and change the path to eg C:\Temp\Yawcam1.
Then do the same with file service_profile.cfg in the folder C:\Program Files\yawcam2 (Set the path: C:\Temp\Yawcam2).
It is still necessary to edit the file start.bat in the folder C:\Program Files\yawcam1 (and yawcam2 too). Add the word service to the end:
…bla bla… -splash:img/splash.gif yawcam.Main service
Gradually run both applications YAWCAM. Set the necessary values for each application. After finishing in both folders (set in the file service_profile.cfg) are created subfolders .yawcam. There are stored main application settings. Two different installation folder => two different settings files! ;-)


